
As the Easter season approaches, families are gearing up for the cherished tradition of decorating Easter eggs. While the classic approach of dyeing eggs in pastel shades remains timeless, a world of creative possibilities is waiting to be explored. From whimsical, cute Easter eggs to elegant golden foiled designs, we’ve curated a collection of wow-worthy decorating ideas that will bring a smile to everyone’s face.
Whether you're a seasoned egg decorator or someone looking to try something new this year, these inspiring ideas promise to elevate the festive spirit and turn your Easter eggs into miniature works of art.
- Easter Egg Designs to Try
- How to Decorate Easter Eggs
- Tips for Decorating Easter Eggs
- Easter Egg Decorating FAQs
- Have an Egg-Cellent Easter With DIY Eggs
Easter Egg Designs to Try
Immerse yourself in the captivating realm of gingham, glitter, and galaxy Easter egg designs, where diverse patterns and materials introduce a playful dimension to your egg decorating endeavors. Unleash your creativity with stamps, gold foil, washi tape, and more, as these unique creations infuse charm into your home and serve as a fun challenge for your crafting skills!
1. Marble Easter eggs
Creating marble Easter eggs is a fun way to add a touch of elegance to your festive decorations. For a sophisticated touch, try the classic nail polish technique. Make sure to hard-boil and cool your eggs first, and in a container filled with water, swirl a mix of nail polish in different colors with a toothpick. Hold the egg and dip it into the water to let the marble design adhere.
2. Stamped Easter eggs
If you want an easy egg-decorating technique, get your hands on some stamps. Next, prepare ink pads or gel food coloring with the colors of your choice. Gently press the stamp onto the ink pads and firmly press the stamp onto the eggshell. For added precision, consider using stamping guides or templates to create intricate designs.
3. Black and white Easter eggs
If you feel like skipping the pastel colors this year, black and white Easter eggs may be a perfect alternative. Use fine-tip black markers to draw intricate patterns, geometric shapes, or doodles directly onto the eggshells. Experiment with different patterns to create unique pieces of monochromatic art, and make sure you allow the marker ink to dry before showcasing your Easter eggs.
4. Glitter Easter eggs
Transforming your Easter eggs into sparkling masterpieces is delightful and easy. Gather an assortment of colorful glitter and craft glue and apply a thin, even layer of glue using a brush or your fingers. After coating the egg with glue, generously sprinkle glitter onto the egg, ensuring all surfaces are covered. You can experiment with different glitter colors or create mesmerizing patterns by strategically applying the glitter.
5. Gingham Easter eggs
For a fun and classic gingham pattern, gather a set of fine-tip markers in contrasting colors. Begin by drawing horizontal and vertical lines on the egg to create a grid, ensuring the lines are evenly spaced. Once the grid is in place, add diagonal lines connecting the intersections to form the iconic gingham pattern. Take your time to ensure precision and symmetry, allowing your creativity to shine through in the intricate details.
6. Naturally dyed Easter eggs
If you want to go for an eco-friendly Easter egg decorating approach, consider the beautiful look of a natural dye. A variety of fruits, vegetables, and herbs, such as beets, blueberries, turmeric, and red cabbage, possess vibrant pigments, allowing you to simmer them in water to create a sustainable dye. Let your eggs soak in this natural dye to achieve a spectrum of beautiful, muted tones for your Easter eggs.
7. Golden foiled Easter eggs
Add a touch of luxury to your Easter egg decorating with golden foiled eggs. Apply a thin layer of craft glue to the eggshell and delicately press sheets of gold foil onto it. Peel away the foil to reveal an opulent metallic sheen. Experiment with patterns for a personalized touch.
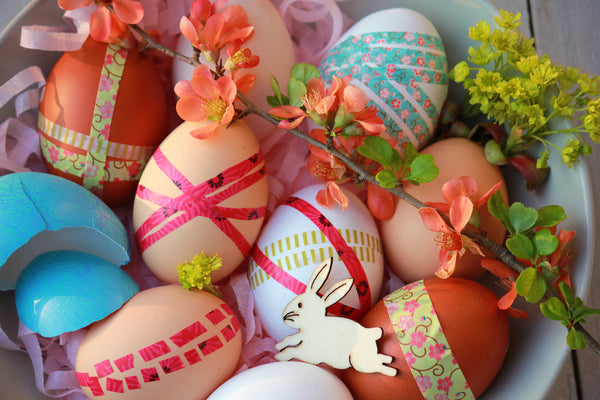
8. Washi tape Easter eggs
Create charming Easter eggs with washi tape. Apply colorful and patterned Washi tape in strips or geometric shapes. Experiment with different tapes to achieve a variety of vibrant and playful designs. This quick and versatile technique adds a touch of creativity and color to your festive Easter decorations.
9. Cute chick Easter eggs
Transform your Easter eggs into adorable chicks with this delightful and easy DIY. Start by using yellow paint to cover the egg entirely, creating the chick's feathery appearance. After the paint dries, add facial features with black paint or markers, bringing each chick to life with expressive eyes and a charming beak. If you're feeling playful, you can even glue tiny feathers onto the egg for a fluffy effect.
10. Terrazzo-inspired eggs
Create chic Easter eggs with a terrazzo-inspired design. Choose an array of vibrant acrylic paints to mimic the diverse and speckled patterns of terrazzo. Use a small paintbrush or toothpick to meticulously dot and splatter the colors across the eggshell, creating an intricate terrazzo effect. Allow each layer to dry before adding more colors.
11. Sticker Easter eggs
Decorating Easter eggs with stickers is a quick and easy way to add colorful and playful designs to your festive creations. Choose an assortment of stickers in various shapes, colors, and themes and arrange them any way you like. This method is especially suitable for a kid’s birthday party or those looking for a fuss-free yet visually appealing way to decorate Easter eggs.
12. Galaxy Easter eggs
Crafting galaxy-themed Easter eggs brings a touch of cosmic wonder to your holiday decorations. Begin by applying a dark-colored base coat using acrylic paint or dye. Once dry, use a sponge or a paintbrush to add swirls of vibrant cosmic colors such as purples, blues, and pinks. Dab on tiny white dots to mimic distant stars, and consider adding a touch of glitter for added sparkle.
13. Watercolor Easter eggs
Achieve a soft and artistic touch with watercolor Easter eggs. Prepare a palette of watercolor paints in your chosen hues. Using a fine brush, apply the paint directly onto the eggshell, blending and layering the colors to create a delicate, watercolor effect. Allow the eggs to dry completely; if desired, add additional layers for depth and richness.
14. Pressed flower Easter eggs
Infuse a touch of nature into your Easter decorations with pressed flower Easter eggs. Select small, delicate, pressed flowers in various colors and shapes. Using craft glue, gently adhere the pressed flowers onto the eggshell, arranging them in a visually appealing pattern. Allow the glue to dry completely to ensure the flowers adhere securely.
How to Decorate Easter Eggs
Easter egg decorating involves a few steps of preparation before you can gather your crafting materials. Take a moment to familiarize yourself with these preliminary measures to ensure a smooth and enjoyable start to your crafting adventure.
1. Hollow or boil your eggs
Hollowing an egg involves removing the contents inside the eggshell, leaving only the shell intact for decorative purposes. Hollowing eggs offers a practical advantage, allowing you to preserve them for future use and minimizing potential messes in case of breakage.
To hollow a raw egg, make small holes at both ends using a pin or needle. Enlarge one of the holes slightly by wiggling the needle, and break the yolk inside by pushing the needle into the hole. Then, gently blow through the smaller hole, forcing the egg's contents out through the larger hole. Rinse the hollowed egg under running water to clean the interior.
On the other hand, hard-cooked eggs serve a different purpose. They are best when you desire a sturdy egg for hiding during an Easter egg hunt or when you plan to consume them later. Hard-cooked eggs are also more manageable for younger children, making them an excellent choice for decorative and practical Easter traditions.
To hard boil eggs, place raw eggs in a pot, cover them with water, and bring them to a boil. Once boiling, reduce the heat and simmer for 10 to 12 minutes. Afterward, cool the eggs in cold water.
2. Choose your Easter egg designs
Selecting your Easter egg designs is an exciting step in the egg decorating process. Allow your creativity to take flight and personalize your eggs based on your preferences. Consider exploring different Easter egg ideas like the ones we listed above. Take your time to envision the end results, and let your imagination guide you as you bring your chosen designs to life.
3. Start decorating
Having chosen your Easter egg designs, it's time to embark on the hands-on process of decorating. Set up your workspace and gather your chosen materials. Enjoy the creative process as you watch your envisioned designs take shape on each beautifully decorated egg.

Tips for Decorating Easter Eggs
Here are some tips for decorating Easter eggs as you embark on your journey:
- Make use of pantry items: Opt for natural dyes using pantry items like turmeric, beets, or blueberries for an eco-friendly and vibrant palette.
- Find rubber bands: Create unique patterns by wrapping rubber bands around the eggs before dyeing them.
- Use extra ribbons: Enhance elegance by tying delicate ribbons around your beautifully decorated eggs.
- Play around with stickers: Add a playful touch with colorful stickers.
- Hang your eggs: Use your decorated Easter eggs as charming decor.
- Showcase your eggs: Get a designer carton to display your Easter eggs.
Easter Egg Decorating FAQs
What can you use to decorate Easter eggs?
When decorating Easter eggs, almost anything can be used to add flair and creativity. From traditional paints and markers to natural flowers, the possibilities are endless.
Do you boil eggs before decorating?
Boiling eggs before decorating is a common practice, as it ensures the eggs are firm and safe to handle. However, you can choose to hollow your eggs instead. Hollowing involves blowing out the egg contents through small holes, creating a lightweight canvas for decorating. Whether boiled for firmness or hollowed for decorative purposes, the choice depends on your desired outcome.
How long can you keep Easter eggs after decorating?
The shelf life of decorated Easter eggs depends on whether the eggs are hard-boiled or hollowed. If kept refrigerated, hard-boiled eggs can be consumed within one week of boiling. Hollowed eggs can be preserved indefinitely.
Have an Egg-Cellent Easter With DIY Eggs
Decorating Easter eggs adds a touch of joy and festivity to your celebrations. From marbled and glitter eggs to gingham patterns and beyond, the possibilities are as diverse as your imagination. Use the decorating ideas for Easter eggs above to help you get started.
This spring, consider the added charm of Mrs. Fields® Easter cookie gifts. Elevate your Easter with delicious and beautifully crafted treats that are a delightful addition to your decorating activities or a sweet surprise at a cookie exchange. Share the joy of the season and create lasting memories with Mrs. Fields®.